NestJS REST 서버(with Ollama)

NestJS
NestJS는 TypeScript를 기반으로 한 Node.js 웹 어플리케이션 프레임워크입니다. 모듈 구조를 채택해 개발자가 어플리케이션을 효율적으로 설계하고 유지보수할 수 있도록 돕습니다. NestJS는 기본적으로 Express.js프레임워크의 HTTP 서버 라이브러리에서 동작하며, Fastify로 변경할 수 도 있습니다. RESTful API, GraphQL, WebSocket, 마이크로서비스등 다양한 애플리케이션 개발에 적합합니다.
NestJS의 특징
 공식사이트에서 소개하고있는 NestJS의 대표적인 특징들입니다. 모듈화된 설계, TypeScript 지원, 의존성 주입, 유연한 확장성, 강력한 생태계 및 문서등을 특징으로 소개하고 있습니다. NestJS의 또다른 특징으로 강력한 CLI지원이 있습니다. 개발자들은 간단한 커맨드 명령어로 NestJS에서 지원하는 여러가지 Object및 프로젝트 구조를 생성하고 설계할 수 있습니다.
Quick Start
NestJS는 Node.js 런타임 환경에서 구동됩니다. Node.js 설치후에 정상적으로 설치됐는지 확인합니다.
$ node -v
v20.14.0

$ npm -v
10.7.0
이제 Nest CLI를 사용해서 새 프로젝트를 생성할 수 있습니다. 터미널에서 아래 명령어로 새로운 Nest 프로젝트를 만들 수 있습니다.
$ npm i -g @nestjs/cli
$ nest new hi-nest
디렉토리에 프로젝트가 생성되면 src/ 디렉토리에 아래와 같은 구조의 파일들을 확인할 수 있습니다.
src
ㄴapp.controller.spec.ts
ㄴapp.controller.ts
ㄴapp.module.ts
ㄴapp.service.ts
ㄴmain.ts
app.controller.spec.ts : 기본 경로를 가진 컨트롤러입니다.
app.controller.spec.ts : 컨트롤러에 대한 단위 테스트입니다.
app.module.ts : 애플리케이션의 루트 모듈입니다.
app.service.ts : 기본 기능을 제공하는 서비스입니다.
main.ts : Nest애플리케이션 인스턴스를 생성하기 위해 NestFactory 코어함수를 사용하는 메인파일입니다.
설치 과정이 완료되면 커맨드 프롬프트에서 다음 명령어로 애플리케이션을 시작할 수 있습니다.
$ npm run start:dev
dev 명령어로 시작하면 파일변경시 자동으로 감지해서 서버를 다시 컴파일하고 로드하게 됩니다. 브라우저를 열고 http://localhost:3000/ 으로 이동하면 Hello World. 메세지가 표시됩니다. 이렇게 별도의 설정이나 파일 작성없이, CLI 명령어 몇줄로 간단하게 웹 어플리케이션 프로젝트를 생성하고 실행할 수 있습니다.
모듈
모듈은 NestJS 특징에서 소개했다싶이 Nest가 애플리케이션 구조를 구성하는데 사용하는 핵심 클래스입니다. 각 애플리케이션은 최소한 하나의 루트 모듈이 존재하고, 루트 모듈은 nest가 애플리케이션을 빌드하는데 사용하는 시작점입니다. 아주 간단한 애플리케이션은 루트 모듈 하나만 있어도 되지만, 일반적으로 밀접하게 관련된 각각의 기능세트를 캡슐화한 모듈로 구성하여 여러개의 모듈을 사용하는 아키텍처를 구성하게 됩니다.
저는 Nest로 Ollama와 REST 통신을 하고 웹소켓으로 메세지를 전송하는 어댑터 서버를 만들것이기 때문에, 3개의 모듈을 생성하겠습니다.
- LLM - 클라이언트 단에서 요청을 받는 REST서비스를 제공
- Cast - Ollama 서버에 REST 통신
- Socket - 웹소켓으로 REST 통신 결과 스트림 제공
커맨드창에서 nest 입력시 사용가능한 CLI 커맨드 목록과 설명이 나타납니다.
$ nest
Usage: nest <command> [options]

Options:
  -v, --version                                   Output the current version.
  -h, --help                                      Output usage information.

Commands:
  new|n [options] [name]                          Generate Nest application.
  build [options] [app]                           Build Nest application.
  start [options] [app]                           Run Nest application.
  info|i                                          Display Nest project details.
  add [options] <library>                         Adds support for an external library to your project.
  generate|g [options] <schematic> [name] [path]  Generate a Nest element.
    Schematics available on @nestjs/schematics collection:
      ┌───────────────┬─────────────┬──────────────────────────────────────────────┐
      │ name          │ alias       │ description                                  │
      │ application   │ application │ Generate a new application workspace         │
      │ class         │ cl          │ Generate a new class                         │
      │ configuration │ config      │ Generate a CLI configuration file            │
      │ controller    │ co          │ Generate a controller declaration            │
      │ decorator     │ d           │ Generate a custom decorator                  │
      │ filter        │ f           │ Generate a filter declaration                │
      │ gateway       │ ga          │ Generate a gateway declaration               │
      │ guard         │ gu          │ Generate a guard declaration                 │
      │ interceptor   │ itc         │ Generate an interceptor declaration          │
      │ interface     │ itf         │ Generate an interface                        │
      │ library       │ lib         │ Generate a new library within a monorepo     │
      │ middleware    │ mi          │ Generate a middleware declaration            │
      │ module        │ mo          │ Generate a module declaration                │
      │ pipe          │ pi          │ Generate a pipe declaration                  │
      │ provider      │ pr          │ Generate a provider declaration              │
      │ resolver      │ r           │ Generate a GraphQL resolver declaration      │
      │ resource      │ res         │ Generate a new CRUD resource                 │
      │ service       │ s           │ Generate a service declaration               │
      │ sub-app       │ app         │ Generate a new application within a monorepo │
      └───────────────┴─────────────┴──────────────────────────────────────────────┘
$ nest g mo llm
CREATE src/llm/llm.module.ts (84 bytes)
UPDATE src/app.module.ts (314 bytes)

$ nest g mo cast
CREATE src/cast/cast.module.ts (85 bytes)
UPDATE src/app.module.ts (375 bytes)

$ nest g mo socket
CREATE src/socket/socket.module.ts (87 bytes)
UPDATE src/app.module.ts (444 bytes)
src/ 경로에 자동으로 각 모듈 클래스 폴더와 파일이 생성되고, app.module.ts 파일의 AppModule클래스에 방금 추가한 모듈들이 imports되어있습니다.
@Module({
  imports: [LlmModule, CastModule, SocketModule],
  controllers: [AppController],
  providers: [AppService],
})
export class AppModule {}
컨트롤러와 서비스 클래스
llm 모듈은 클라이언트(사용자)들에게 REST 요청을 받아서 여러가지 서비스를 제공하는 시작점 모듈입니다. 모듈과 마찬가지로 nest g 명령어를 사용해 서비스와 컨트롤러 클래스를 간단하게 추가할 수 있습니다. 이름은 모듈과 똑같이 입력해야 하며, 자동으로 모듈클래스의 경로에 파일을 생성합니다.
각 모듈의 경로로 이동해서 명령어를 입력할 필요가 없습니다! Nest가 알아서 찾아서 생성해줍니다. 또한 모듈에 자동으로 import도 해줍니다.
$ nest g co llm
CREATE src/llm/llm.controller.ts (99 bytes)
CREATE src/llm/llm.controller.spec.ts (489 bytes)
UPDATE src/llm/llm.module.ts (166 bytes)

$ nest g s llm
CREATE src/llm/llm.service.ts (91 bytes)
CREATE src/llm/llm.service.spec.ts (457 bytes)
UPDATE src/llm/llm.module.ts (237 bytes)
import { Module } from '@nestjs/common';
import { LlmController } from './llm.controller';
import { LlmService } from './llm.service';

@Module({
  controllers: [LlmController],
  providers: [LlmService]
})
export class LlmModule {}
다음으로 cast 서비스를 생성하겠습니다.
$ nest g s cast
CREATE src/cast/cast.service.ts (92 bytes)
CREATE src/cast/cast.service.spec.ts (464 bytes)
UPDATE src/cast/cast.module.ts (159 bytes)
마지막으로 socket 서비스입니다. socket은 Nest에서 지원하는 웹소켓 스키마인 gateway로 생성합니다.
$ nest g ga socket
CREATE src/socket/socket.gateway.ts (249 bytes)
CREATE src/socket/socket.gateway.spec.ts (478 bytes)
UPDATE src/socket/socket.module.ts (167 bytes)
최종적으로 구성된 파일구조입니다. *.spec.ts파일은 테스트를 위한 파일로 현재는 필요없어서 전부 삭제했습니다.
src
 ㄴcast
  ㄴcast.module.ts
  ㄴcast.service.ts
 ㄴllm
  ㄴllm.controller.ts
  ㄴllm.module.ts
 ㄴsocket
  ㄴsocket.gateway.ts
  ㄴsocket.module.ts
ㄴapp.controller.spec.ts
ㄴapp.controller.ts
ㄴapp.module.ts
ㄴapp.service.ts
ㄴmain.ts
다음으로 Nest에서 요청에 대한 답변을 받아오는 LLM 모델 API 서버를 구축하기 위해 Ollama를 설치하도록 하겠습니다. Ollama는 간략히 설명하면 LLM(Large Language Model)을 로컬 환경에서 쉽게 실행하고 활용할 수 있도록 돕는 오픈 소스 도구입니다. 본 포스팅에선 주요 주제가 아니기 때문에 자세한 설치과정 및 사용법은 생략하고 진행하겠습니다. 저는 Ollama를 설치후에 llama3.2모델을 다운받았습니다. Ollama를 설치하고나면 Ollama API를 사용할 수 있습니다. REST 요청으로 질의에 대한 답변을 스트림형태로 받아올 수 있습니다.
 postman으로 Ollama API를 테스트
위의 Ollama API를 호출할 CastService 클래스파일을 작성합니다.
$ npm i --save @nestjs/axios axios

added 4 packages, and audited 704 packages in 3s

117 packages are looking for funding
  run `npm fund` for details

found 0 vulnerabilities
@Injectable()
export class CastService {
    constructor(private readonly httpService: HttpService) {}

    async getVersion(): Promise<AxiosResponse<any>> {
        const response: AxiosResponse = await this.httpService.axiosRef.get('http://localhost:11434/api/version');
        return response.data;
    }

    generate(prompt: string): Observable<AxiosResponse<any>> {
        return this.httpService.post('http://localhost:11434/api/generate',{
            "model": "llama3.2",
            "prompt": prompt,
            "stream": false
        }).pipe(
            map((response: AxiosResponse)=>response.data),
        );
    }

}
HttpService클래스를 사용해서 두개의 메서드를 정의했습니다. 기본적으로 Ollama의 버전을 받아오는 getVersion, 답변을 질의하는 generate 메서드입니다. 위 코드에선 두가지 구현방식이 적용된걸 볼 수 있는데, 각 방식의 비교 평가는 아래와 같습니다.
| 측면 | getVersion | generate |
|---|---|---|
| 호출 방식 | Promise 기반 | Observable 기반 |
| NestJS 친화성 | 표준 방식은 아니지만 적합 | NestJS의 RxJS 철학에 부합 |
| 단순성 | 구현이 간단하고 이해하기 쉬움 | 데이터 흐름 관리 시 다소 복잡 |
| 유연성 | 동기적 코드처럼 간단하게 작동 | 스트리밍 및 리액티브 작업 체인 구성 가능 |
| 적합성 | 단순한 데이터 호출에 적합 | 데이터 스트리밍이나 비동기 작업 체인에 적합 |
| 순환 참조 문제 처리 | 기본적으로 문제가 없음 | map으로 response.data만 추출해 문제 예방 |
작성된 CastService를 외부 모듈에서 주입해서 사용할 수 있게 CastModule 클래스를 수정합니다.
@Module({
  imports: [HttpModule],
  providers: [CastService],
  exports: [CastService]
})
export class CastModule {}
다음으로 웹소켓 기반 기능을 사용하기 위한 게이트웨이 클래스를 작성합니다.
$ npm i --save @nestjs/websockets @nestjs/platform-socket.io
@WebSocketGateway(4321, {namespace: 'events'})
export class SocketGateway implements OnGatewayInit, OnGatewayConnection, OnGatewayDisconnect{

  @WebSocketServer() server: Server;

  private clients = new Map<string, Socket>();

  afterInit(server: any) {
    console.log('WebSocket Gateway Initialized');
  }

  handleConnection(client: any, ...args: any[]) {
    console.log(`Client connected: ${client.id}`);
    this.clients.set(client.id, client);
  }

  handleDisconnect(client: any) {
    console.log(`Client disconnected: ${client.id}`);
    this.clients.delete(client.id);
  }

  sendToClient(clientId: string, data: any) {
    const client = this.clients.get(clientId);
    if (client) {
      client.emit('streamData', data); // 'streamData' 이벤트로 데이터 전송
    } else {
      console.error(`Client not found: ${clientId}`);
    }
  }
}
@Module({
  providers: [SocketGateway],
  exports: [SocketGateway]
})
export class SocketModule {}
SocketGateway 클래스는 애플리케이션이 시작하면 소켓서버를 초기화하고 커넥팅을 기다립니다. 4321 포트로 소켓 소버를 오픈하고 ‘events’로 path로 연결되는 클라이언트를 관리하게 됩니다. sendtoClient 메소드는 클라이언트 목록에서 전달받은 client.id로 응답할 클라이언트를 찾아서 ‘streamData’이벤트로 data를 전송합니다.(emit)
llm 서비스에 cast 서비스 클래스를 주입받아서 메서드를 사용하고, 해당 모듈의 의존성을 위해 llm 모듈에 import해줍니다.
@Injectable()
export class LlmService {
    constructor(private readonly castService: CastService) {}

    getVersion() {
        return this.castService.getVersion();
    }

    generate(prompt: string) {
        return this.castService.generate(prompt);
    }
}
@Module({
  imports: [CastModule, SocketModule],
  controllers: [LlmController],
  providers: [LlmService]
})
export class LlmModule {}
마지막으로 cast 서비스와 socket 서비스를 연결시키는 시작점인 llm 컨트롤러 클래스를 작성합니다. llm 컨트롤러는 Ollama의 버전 정보를 전달받는 get요청, 질의문을 전달하는 post 요청을 가지고 있습니다.
@Controller('llm')
export class LlmController {
    constructor(
        private readonly llmService: LlmService,
        private readonly socketGateway: SocketGateway
    ) {}

    @Get('/version')
    getVersion() {
        return this.llmService.getVersion();
    }

    @Post('/generate')
    generate(@Body() body:{clientId: string, prompt: string}) {
        const { clientId, prompt } = body;

        this.llmService.generate(prompt).subscribe({
            next: (data) => {
                this.socketGateway.sendToClient(clientId, data);
              },
              error: (err) => {
                console.error(`Error while streaming to client ${clientId}:`, err);
                this.socketGateway.sendToClient(clientId, { error: 'Streaming error' });
              },
              complete: () => {
                console.log(`Streaming completed for client: ${clientId}`);
                this.socketGateway.sendToClient(clientId, { message: 'Streaming completed' });
              },
        });

        return { status: 'Streaming started' };
    }
}
llmService의 generate 메서드는 Observable 객체를 반환합니다. 해당 객체는 subscirbe(구독)을 통해 스트리밍되는 데이터를 받을 수 있으며, next(스트리밍 데이터를 수신할때 호출), error(스트리밍 과정에서 오류가 발생할때 호출), complete(스트리밍이 정상적으로 완료되었을때 호출) 3가지 콜백을 받습니다. 클라이언트가 특정 REST API를 호출하고, llmService가 외부 API의 스트림데이터를 받아오고, 받아오는 데이터를 구독하여 웹소켓으로 특정 클라이언트한테 전송(sendToClient) 하는게 전체적인 흐름입니다.
Test
이제 Nest서버를 실행시키고, 정상적으로 통신이 이루어 지는지 테스트 해보겠습니다. 저는 웹소켓 커넥션을 위해 클라이언트 코드를 따로 작성하지 않고 postman에서 제공하는 웹소켓 커넥션을 사용해서 테스트하겠습니다.
My Workspace -> Collections -> New Collections -> New -> Socket.io 순서로 새로운 웹소켓 커넥션을 만들어 아래와 같이 설정합니다.
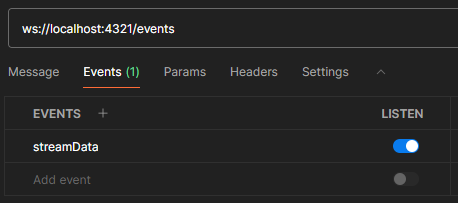
접속 경로는 ws://localhost:4321/events, 리스닝 이벤트는 ‘streamData’로 하겠습니다. 이제 커넥션을 누르면, postman Response에 정상적으로 연결된 상태가 표시되며 streamData 이벤트를 리스닝 중이라고 표시됩니다. 그리고 Nest서버 로컬에는 연결된 클라이언트 id가 출력됩니다.
Client connected: Uz38VcY-zErSptBTAAAB
해당 클라이언트 id를 사용해서 generate 요청을 해보겠습니다. postman에서 새로운 post요청을 하나 생성하고, http://localhost:3000/llm/generate 경로로 아래와 같은 json 데이터를 body에 담아서 post요청을 날립니다.
{
    "clientId" : "Uz38VcY-zErSptBTAAAB",
    "prompt" : "why is the sky blue?"
}
json 응답으로 “status”:”Streaming started”를 응답받고, 잠시후 스트리밍이 완료되면 NestJS 콘솔에 완료 로그가 출력됩니다. postman에 웹소켓 커넥션의 Response탭을 보면, Ollama에서 받아온 스트림 데이터를 정상적으로 서버가 클라이언트에게 전송해서 출력된 모습을 확인할 수 있습니다.

Reference
https://docs.nestjs.com/first-steps
https://github.com/ollama/ollama/blob/main/docs/api.md
Read more
-
CursorAI 활용법, 실제 적용사례 소개
AI 에이전트 툴을 사용할때 활용한 팁, 실제 사례 소개 -
CursorAI를 사용해서 1800줄이 넘는 JS코드 리팩토링하기
AI 에이전트 툴을 사용해 소스코드를 유지보수 하기 쉽게 수정해 봅니다 -
지도상에 항공 경로(원호) 표현하기
Openlayers와 turf 라이브러리로 래스터맵 위에 arc feature 표시 -
Docker로 nginx 서버 실행하기
윈도우 환경에서 Docker Desktop을 사용해서 nginx 스트리밍 서버를 실행시키는 방법